Self-host Calendar Ghost
This guide deploys the Calendar Ghost Community Edition on infrastructure you control. The Community Edition is one service: one SQLite database, one scheduler, and one application process, for you alone, for people you invite, or for people who verify their email when you choose Open, each with private calendars and rules. It does not require a Calendar Ghost account, hosted coordinator, telemetry, or subscription.
For the data inventory and deletion rules, read Data ownership and privacy. For deployment details and the LAN redirect options, read Deployment.
1. Prepare the host
You need:
- Docker with Compose v2;
- durable storage for the Compose data volume;
- a host with a synchronized clock; and
- one or more Google or Microsoft accounts whose calendars you want to connect.
The supplied image targets linux/amd64 and linux/arm64. Keep the installation on a trusted
machine or place it behind HTTPS before exposing it beyond your local network.
2. Register Calendar Ghost with your calendar providers
Register Calendar Ghost with Google, with Microsoft, or with both, depending on whose calendars you will connect. A provider you do not register is not offered.
| To | Read |
|---|---|
| Connect Gmail or Google Workspace calendars | Create a Google Cloud application |
| Connect Outlook.com or Microsoft 365 calendars | Register a Microsoft Entra application |
| Put each client ID and secret in place | 3. Configure the installation |
| Run on a Raspberry Pi or another host than your computer | 5. Use a LAN host or HTTPS |
Create a Google Cloud application
Each self-hosted installation should use its own Google Cloud project and OAuth client. Do not copy another operator’s client secret into your installation.
-
Open the Google Cloud Console, create or select a project, and open APIs & Services → Library.
-
Enable Google Calendar API. Google documents the general process in Enable and manage APIs.
-
Open Google Auth Platform → Branding and configure the application name, support email, and contact information. Choose the audience deliberately:
- Internal is for accounts in one Google Workspace organization.
- External is for personal Google accounts or accounts from multiple organizations.
-
If Google Auth Platform shows a Data access or scopes page, add the scopes used by this application:
https://www.googleapis.com/auth/calendar.events
https://www.googleapis.com/auth/calendar.calendarlist.readonly
openid
https://www.googleapis.com/auth/userinfo.profile
The first scope allows Calendar Ghost to read and manage events selected by a rule. The second lets it list calendars and their access roles. The profile scopes identify a Connected Account in the local UI; they are not used to read calendar content. See Google’s Calendar API authorization guide for the scope descriptions.
-
For an External app in testing, add every Google identity you will connect under Test users. Accounts that are not listed there cannot complete consent while the app is in testing.
-
Open Google Auth Platform → Clients → Create client, choose Web application, and copy the client ID and client secret.
-
Add this exact authorized redirect URI to the client:
http://localhost:8000/api/v1/oauth/google/callbackThe URI must match the value used by the installation exactly, including scheme, host, port, path, and trailing slash. Google’s web-server OAuth guide explains the client and redirect-URI requirements. Keep the client secret out of source control and out of screenshots.
External-app testing and verification
Testing is suitable for initial setup and short-lived development only. For a long-running self-hosted installation, move the OAuth consent screen’s publishing status to In production before connecting calendars. Google says refresh tokens issued to an External app in Testing expire after seven days unless the app requests only basic profile scopes; Calendar Ghost requests Calendar scopes, so scheduled synchronization can stop after seven days until the account is reauthorized. See Google’s refresh-token expiration guidance.
While the app is in testing, every connected identity must be listed as a test user, and Google may show a testing or unverified-app warning during consent. A future public hosted service is a separate OAuth product and may need its own Google verification and production-audience process; do not reuse one operator’s self-hosted credentials for it.
Register a Microsoft Entra application
Skip this if nobody will connect a Microsoft account. Each installation registers its own application; do not copy another operator’s client secret into your installation. Calendar Ghost reaches Outlook calendars through Microsoft Graph, for Microsoft 365 work or school accounts and for personal Outlook.com accounts. Outlook is verified with personal Microsoft accounts, such as Outlook.com and Hotmail. Microsoft 365 work or school accounts can connect, but are not yet verified: the checks in ADR 0034 have not yet run against one.
-
Sign in with an account that may register applications in a directory you control, and open App registrations → New registration:
- With a work or school account, use the Microsoft Entra admin center (Entra ID → App registrations). Your organization may require its IT administrator’s approval.
- With a personal account, such as Outlook.com or Hotmail, use the Azure portal and search for App registrations; the Entra admin center refuses personal accounts. A personal account needs a directory of its own: signing up for a free Azure account creates one, Default Directory, after Microsoft verifies a phone number and a card. Registering an application charges nothing.
- Check the directory named at the top right before registering. An account that was invited
as a guest to another organization (its sign-in shows
#EXT#) may be taken to that organization’s directory; choose Settings → Directories + subscriptions and switch to your own.
Microsoft’s Register an application quickstart explains who may register one.
-
Enter a name, such as
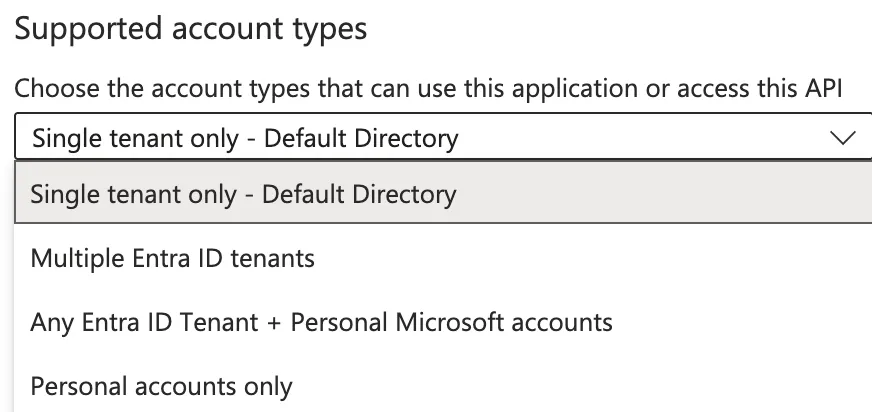
Calendar Ghost, and choose Supported account types:- Any Entra ID Tenant + Personal Microsoft accounts (earlier named “Accounts in any
organizational directory and personal Microsoft accounts”) lets both work or school accounts
and Outlook.com accounts connect. Keep
CALENDAR_SYNC_MICROSOFT_TENANT=common. - Single tenant only (“Accounts in this organizational directory only”) lets only your
organization’s accounts connect. Set
CALENDAR_SYNC_MICROSOFT_TENANTto the Directory (tenant) ID from the application’s Overview. - Personal accounts only (“Personal Microsoft accounts only”) lets only Outlook.com accounts
connect. Set
CALENDAR_SYNC_MICROSOFT_TENANT=consumers.
- Any Entra ID Tenant + Personal Microsoft accounts (earlier named “Accounts in any
organizational directory and personal Microsoft accounts”) lets both work or school accounts
and Outlook.com accounts connect. Keep
-
Under Redirect URI, choose the Web platform and enter this exact address, then choose Register:
http://localhost:8000/api/v1/oauth/microsoft/callbackLike Google, Microsoft accepts plain HTTP only for
localhost; for another host, register an HTTPS address (5. Use a LAN host or HTTPS). More addresses can be added later under Authentication. -
On the application’s Overview, copy the Application (client) ID. It is
CALENDAR_SYNC_MICROSOFT_CLIENT_IDin 3. Configure the installation. Supported account types reads All Microsoft account users for the first choice in step 2.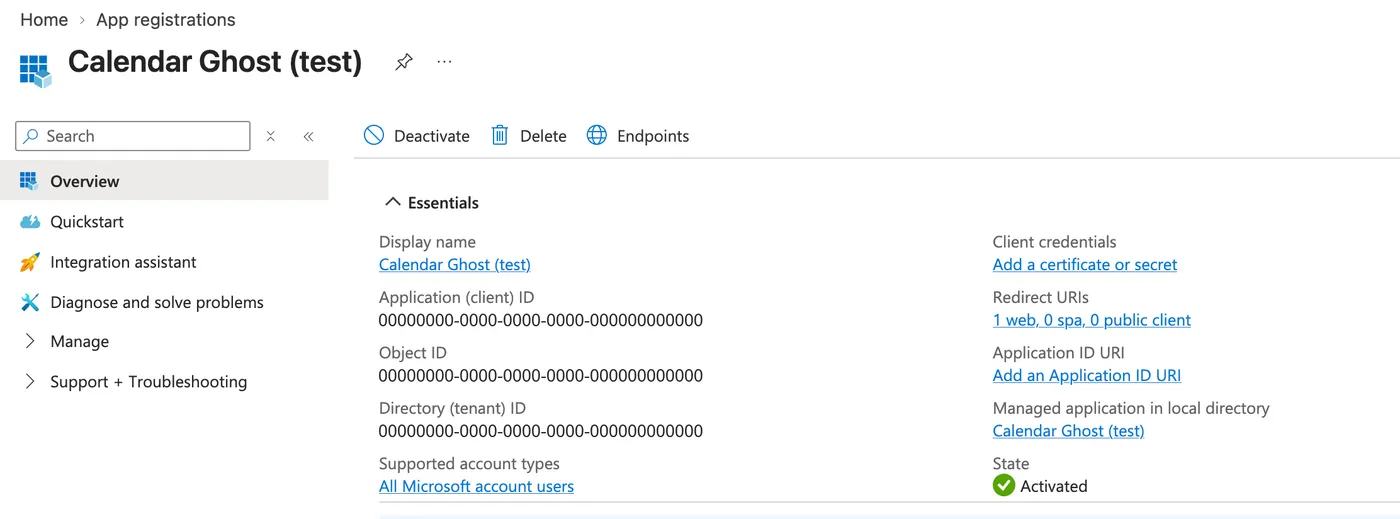
-
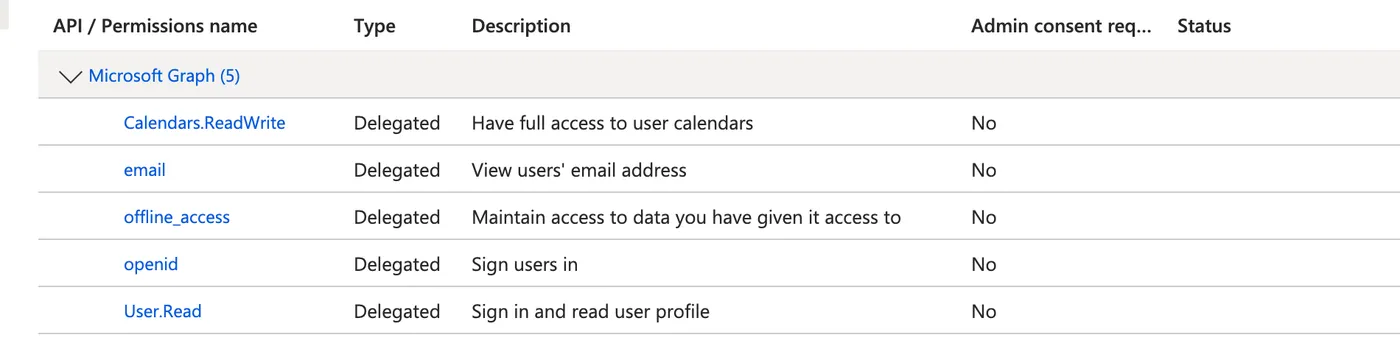
Open API permissions → Add a permission → Microsoft Graph → Delegated permissions and add these, keeping User.Read, which is there already:
openid email offline_access User.Read Calendars.ReadWriteCalendars.ReadWritelets Calendar Ghost read the events a rule selects and manage the events it writes;offline_accesskeeps synchronizing while nobody is signed in; the others identify the Connected Account. Add no application permissions and noCalendars.ReadWrite.Shared. None of these needs an administrator’s consent, but an organization may allow only its IT administrator to approve applications: they then choose Grant admin consent on this page.The list then shows five delegated permissions, none of which needs an administrator’s consent:
-
Open Certificates & secrets → Client secrets → New client secret (or Add a certificate or secret on the Overview), enter a description, and choose when it expires. The portal recommends 180 days; the longest is 24 months. Copy the secret’s Value at once, since it is shown only this one time, and not its Secret ID. It is
CALENDAR_SYNC_MICROSOFT_CLIENT_SECRET. Keep it out of source control and out of screenshots. -
Copy the secret’s Expires date into
.envasCALENDAR_SYNC_MICROSOFT_CLIENT_SECRET_EXPIRES, such as2027-04-12. Calendar Ghost cannot read the date from Microsoft. With it, People and Installation Health warn you from 30 days before the secret expires, and so does the installation’s email or webhook if you set one up.
To rotate the secret before it expires:
- Create a new client secret as in step 6, leaving the old one in place.
- Put the new Value in
.envasCALENDAR_SYNC_MICROSOFT_CLIENT_SECRET, and its Expires date asCALENDAR_SYNC_MICROSOFT_CLIENT_SECRET_EXPIRES, then rundocker compose up -d. - Wait about two hours, so that every access token issued before the change has expired and has been renewed with the new secret. If People shows nothing that needs you, delete the old secret in Certificates & secrets.
Nobody needs to reauthorize: grants belong to the application, not to one secret. If a secret expires first, every Microsoft account stops at once with the likely cause “Microsoft no longer accepts this installation’s OAuth client”; the fix is the same rotation. After it, the first scheduled pass checks every stopped account again and restarts its rules, so nobody has to act.
3. Configure the installation
From the Calendar Ghost checkout, copy the example environment file:
cp .env.example .envGenerate a fresh 256-bit installation master key:
python3 -c 'import base64,secrets; print(base64.urlsafe_b64encode(secrets.token_bytes(32)).decode())'Set these values in .env:
CALENDAR_SYNC_MASTER_KEY=PASTE_GENERATED_KEY_HERE
CALENDAR_SYNC_GOOGLE_CLIENT_ID=PASTE_GOOGLE_CLIENT_ID_HERE
CALENDAR_SYNC_GOOGLE_CLIENT_SECRET=PASTE_GOOGLE_CLIENT_SECRET_HERE
CALENDAR_SYNC_GOOGLE_REDIRECT_URI=http://localhost:8000/api/v1/oauth/google/callback
# Only if you registered a Microsoft Entra application:
CALENDAR_SYNC_MICROSOFT_CLIENT_ID=PASTE_APPLICATION_CLIENT_ID_HERE
CALENDAR_SYNC_MICROSOFT_CLIENT_SECRET=PASTE_CLIENT_SECRET_VALUE_HERE
CALENDAR_SYNC_MICROSOFT_REDIRECT_URI=http://localhost:8000/api/v1/oauth/microsoft/callback
CALENDAR_SYNC_MICROSOFT_TENANT=common
CALENDAR_SYNC_MICROSOFT_CLIENT_SECRET_EXPIRES=2027-04-12
# Optional: make the UI's Source link point to the exact checkout being built.
# CALENDAR_GHOST_SOURCE_URL=https://github.com/DannieBGoode/calendar-ghost/tree/<commit-or-tag>
Leave out the lines of a provider you did not register. The master key encrypts stored Google and
Microsoft credentials and seals sensitive event-history values. Back it
up separately from the database. Never commit .env, replace the master key on an existing
installation, or paste either secret into an issue. Losing the key makes encrypted credentials and
sealed history unreadable.
4. Start and complete first-run setup
Start the one-process service:
docker compose up -d --build
curl --fail http://localhost:8000/health
Open http://localhost:8000 and create the administrator with your email and a password of at least 12 characters. Then:
- Connect each Google or Microsoft identity. The browser must be able to return to the configured redirect URI after the provider’s consent.
- Create a Directional Sync Rule with one Source Calendar and one Destination Calendar.
- Keep the default Busy-Only Projection unless you have a reason to expose more detail.
- Preview the rule, inspect the decisions, and enable it.
- Check Activity after the first run and confirm that the destination contains only the projections you intended.
Check Settings → Connections → Connected accounts if a calendar is missing. The access check uses read-only requests and reports which calendars can be used as destinations.
Invite other people
A new installation is for you alone: its Registration Policy is Only me, so nobody else can join and the app shows nothing about other people. To share it with your household:
- Open Settings → Administration → Who can join and choose Invitation only. A People page appears in the main navigation.
- On People, choose Invite someone and pass the link on yourself. It works once and expires after 7 days; the person chooses their own email and password. Once a Plan is the default, Invitations says which Plan they will get; you can change it after they join.
- Everyone’s calendar accounts, rules, Activity, and tokens are their own. As the administrator you see each person’s email, role, whether they may sign in, when they joined, when they last signed in, and, once you define a Plan, their Plan, never their calendars or events. Search by part of an email, filter by role, state, or sync status, and, once you define a Plan, by Plan, sort by email, joining, or last sign-in, and page through 50 people at a time; the address keeps your choices, so a reload or a shared link shows the same list.
From People you can also make someone an administrator, disable someone, which signs them out
and holds their rules until you enable them again, create a password reset link for someone who
forgot theirs, or delete someone. Deleting someone deletes their sign-in, rules, calendar connections,
tokens, and Activity, and the events their rules wrote wherever Calendar Ghost can still reach
them; their own events and their Google and Microsoft accounts stay as they are. While anyone else remains, the
installation keeps one administrator who can sign in, so the last administrator must make someone
else an administrator before deleting their own account. You may return to Only me once you are
the only person again. Anyone can change their own email and password, turn their email notifications
off, or delete their own account under Settings → Your account, choosing whether the events
their rules wrote are deleted too. When the last person deletes
their own account, Calendar Ghost returns to setup: the next person to open it creates the
administrator, as on a new installation, and the OAuth settings and master key in .env
stay as they were. Plans, if you turned them on, turn off and keep their definitions.
To keep one person from using up what everyone shares, open People → Plans (ADR 0038):
- Choose New plan. A full-height drawer opens over the unchanged table, at its own address: give the Plan a name, which no other Plan has, and set the most active rules, calendar accounts, and Integration Tokens a person may have, each No limit or Up to a number (Integration Tokens may also be None), and its Sync speed, from Instant to Every hour. Save plan closes the drawer.
- Give it to people: Assign people in the Plan’s More actions menu, or tick people under Everyone and choose Change plan. Before you save, it says who would be over a limit. Everyone without a Plan of their own has the default, marked Default; Make default in another Plan’s menu moves them, and giving someone the default means they follow it.
- Turn on the Plans switch at the top of the tab. With no default, it adds a Plan named No limits, which limits nobody, as the default, so nothing changes until someone has a smaller Plan. Like giving a Plan and Make default, it applies at once, and a message at the bottom of the window says what changed, with Undo.
Administrators are never limited, and while Plans are off, which is the default, nobody is. A lower rule limit gives rules counting beyond it a seven-day grace. After grace, excess running or lapse-stopped rules are held until the Plan has room; excess replacement drafts give up their reserved places. Existing accounts and tokens keep working; nobody can start a rule, connect a new calendar account, or issue a token past its limit. Someone whose Plan limits anything may also run Sync now, Reconcile now, and Preview 12 times in any hour together, the same on every such Plan, and is then told how many minutes to wait; the No limits Plan counts none of these runs. The tab counts who is over a limit, and Everyone shows each person’s Plan and any limit they are over; the Plan card on a person’s page and each person’s own Settings → Your account → Your plan show a meter for each limit with how much of it they use. Someone has more than their plan allows says what to do when someone is over a limit, and A plan cannot be removed explains Remove.
Let people join with verified email
Keep Only me for your own installation or Invitation only for hand-delivered Invitations without SMTP. To let people join by email:
- Configure secure identity SMTP, the Master Key, and an HTTPS root
CALENDAR_SYNC_PUBLIC_URL. Follow Test identity email, check your inbox, and send a successful test for the current settings. SMTP acceptance alone does not prove inbox delivery. - Review trusted proxy headers, then choose Open under Settings → Administration → Who can join. This is an explicit choice; a test never changes the policy. Plans stay independent and off unless you turn them on.
- Share the installation’s sign-in address. Create account asks for an email and always says, “If this address can join, we will send a verification link.” The link opens a password form for that address. It lasts 24 hours and works once. Completion creates an ordinary User, follows the Default Plan when Plans are on, and signs them in. If admission succeeds but the browser cannot sign in, use ordinary sign-in with the password just chosen.
There is no pending-person approval queue: People lists completed Users, whom you can disable or delete. Existing Users need no retroactive verification. Existing or disabled addresses receive no sign-up mail and are not changed; use Sign in or Forgot password? if appropriate.
Invitations keep their original seven-day expiry. Under Open, the person requests a verification link first; it cannot outlive that expiry, and the Invitation is consumed only when joining finishes. Under Invitation Only the email/password form still joins directly without SMTP. A verification link already bound to an Invitation can finish there without current SMTP readiness. Only Me refuses both routes. Revoking an Invitation also makes its verification links unusable. The separate provider admission exception is described below; it does not enable either password joining route under Only Me.
If no link arrives, check spam, ask the administrator to check identity email, and resend within the limits. Earlier delivered links stay valid until one completes; there is no automatic retry or persistent outbox. Restart, a full queue, or SMTP failure can lose mail without changing the generic acceptance message. A changed SMTP configuration or lost readiness keeps Open selected but temporarily stops public joining and verification under Open. Test the current settings again; existing sign-in and synchronization keep working.
Returning to Invitation only cancels unfinished public sign-ups, while keeping Users and Invitations. Choosing Only me, possible only while you are the sole User, cancels every registration proof. Reopening never revives cancelled links; request new ones. Returning to setup also revokes Invitations and clears email readiness. See exact limits and retention and migration 38 rollback.
Sign in with Google or Microsoft
Both providers start off, including after an upgrade. Setup still creates the first administrator with email and password. To offer provider sign-in:
-
Keep the installation’s existing Google Web application or Microsoft Entra client ID and secret, and its Installation Master Key. Set
CALENDAR_SYNC_PUBLIC_URLto the exact HTTPS root origin people use, such ashttps://calendar.example.com, and setCALENDAR_SYNC_SECURE_COOKIES=true. No path, user information, query, or fragment is allowed. HTTP localhost or literal loopback is permitted for development; usehttp://localhost:8000for the providers’ local Web callbacks. An HTTP LAN address is not usable. -
Add the following exact Web redirect URIs to the existing client registrations, replacing the example origin with yours. Keep the calendar callbacks already registered:
Provider Additional sign-in callback Google https://calendar.example.com/api/v1/sign-in/google/callbackMicrosoft https://calendar.example.com/api/v1/sign-in/microsoft/callbackSign-in requests exactly
openid email profile, without calendar,offline_access, orUser.Readscopes. Addemail/profileidentity permissions to the client registration as needed. TheCALENDAR_SYNC_*_REDIRECT_URIsettings still name calendar callbacks; sign-in callbacks derive only fromCALENDAR_SYNC_PUBLIC_URL. The browser must return to that origin. -
Apply path-only authentication logging on every reverse proxy and restart after changing environment settings. In Settings → Administration → Sign-in providers, check the displayed callback and enable each provider you want to offer. Missing configuration keeps it unavailable. For existing Users and invited provider admission under closed policies, SMTP is unnecessary. Open admission still needs the matching successful identity email test.
People can use the enabled buttons on sign-in, joining, and Invitation pages. Under Open, a provider-verified email can create an ordinary User with no own Plan, following the Default Plan when Plans are on. It creates no Connected Account and uses none of that Allowance. Connect calendars separately under Settings → Connections; signing in grants no calendar access.
A Provider Identity is the validated issuer plus sub, not the email shown by the provider.
Once linked, it continues to identify the same User if that email changes, without changing the
User’s Calendar Ghost email. A new binding may automatically link to an existing active User
only when the provider verifies the email and Calendar Ghost has already verified the same local
address. Upgraded accounts and addresses entered during setup, direct Invitation joining, or a
direct email change need password confirmation for a first provider link. You can instead sign in
through a method you already have and
choose Link in Settings → Your account. A binding belonging to another User is refused.
Microsoft email is treated as unverified: neither email, preferred_username, nor upn
establishes ownership. An already-linked Microsoft identity signs in normally. An unlinked
identity gets the same email/password form whether an account exists or not. Existing Users
enter their Calendar Ghost password, or sign in separately and link from Your account. Newcomers
use Create account, finish the existing email verification/password flow when Open is
available, then explicitly link Microsoft from Your account. Under Invitation Only, use the
ordinary Invitation flow first. No Microsoft email claim alone creates a User. Invitation provider choices therefore offer
Google only when it is enabled and configured. If a link cannot be used, the page keeps the sign-in
and recovery routes available; an unavailable password check alone does not prove the Invitation
expired, since Only Me also refuses password acceptance.
Only Me and Invitation Only admit a new User through provider sign-in only with a still-live Invitation and an email entered for that Invitation matching the provider-verified email. The final transaction rechecks both and consumes the Invitation. Choosing Only Me still requires you to be the sole User and cancels registration proofs; it keeps live Invitations. This narrow provider exception can admit another User later while Only Me remains selected. People and its existing management controls stay available while another User or any live Invitation exists, so an administrator can revoke outstanding Invitations without changing the policy. Only Me still forbids issuing Invitations, ordinary password acceptance, and public joining without an Invitation. Before choosing Only Me, revoke any outstanding Invitation on People if that person should no longer join. Returning to setup revokes all of them.
Your account lists your password and linked providers. Set password creates a first password from your live session, with 12 to 256 characters; replacing one requires its current value. Set a password before changing your email or deleting yourself, since those actions still require it. Linking from Your account, unlinking, and setting a first password keep the current session, end other browser sessions, and invalidate pending reset and email-change work. Password removal is not offered. You cannot remove your last usable method, and an administrator cannot disable a provider if an active User would have no password or other configured, enabled linked provider. Disablement keeps the bindings for later re-enablement.
Environment changes can still interrupt provider-only access. Keep a password or another usable
method before changing provider configuration. Restore the original settings, or have an active
administrator issue a seven-day Password Reset Link, which can set a first password without
enabling a disabled User. Completing any Password Reset Link removes all provider sign-in methods
and ends sessions; calendar connections and rules stay. Sign in with the new password, then link
the providers you trust again in Your account. Recovery preserves the local email verification
state; it does not turn an unverified local address into a verified one. If nobody can administer,
restore configuration or follow
offline backup recovery, with both processes stopped.
Microsoft’s sub is specific to the client ID, so replacing that ID loses the match to existing
bindings. Establish and verify a usable password or another provider before replacing the client.
Sign in with that fallback, remove the obsolete Microsoft binding, then link Microsoft under the
new client configuration. Rotating a secret on the same client is different, but invalidates in-flight flows.
See Microsoft’s ID-token claims reference.
Flows expire after ten minutes. Retry from sign-in after expiry or configuration changes. A shared limit of 100 provider starts per hour can temporarily block everyone who relies only on provider sign-in; wait for the allowance, use a password, or use administrator-issued recovery. See exact limits and network bounds and migration 39 backup and rollback.
5. Use a LAN host or HTTPS
Google and Microsoft accept plain HTTP OAuth redirects for localhost, but not for a private LAN
IP or a .local hostname. For a Raspberry Pi or home server, use either:
- an SSH tunnel while connecting accounts, while keeping the default
localhostredirect; or - an HTTPS hostname, such as a private tailnet name or a domain behind a reverse proxy.
For HTTPS, register the exact URL and set matching values, for example:
CALENDAR_SYNC_GOOGLE_REDIRECT_URI=https://calendar.example.test/api/v1/oauth/google/callback
CALENDAR_SYNC_MICROSOFT_REDIRECT_URI=https://calendar.example.test/api/v1/oauth/microsoft/callback
CALENDAR_SYNC_SECURE_COOKIES=true
Do not expose the service directly to the public internet; Instant Sync below needs only one path to be public. See Google OAuth redirect URI on a LAN host for the tunnel and reverse-proxy options.
Turn on Instant Sync (optional)
Rules sync every five minutes without anything below, unless a Plan sets a longer interval. To have a rule run soon after its Source Calendar changes, Google and Microsoft must reach this installation at a public HTTPS address:
- Forward
/api/v1/watch-notices/through HTTPS with a reverse proxy or Cloudflare Tunnel (examples). Tailscale Serve keeps a name inside your tailnet, which providers cannot reach. - Set
CALENDAR_SYNC_PUBLIC_URLin.envto that address, such ashttps://calendar.example.test, and rundocker compose up -d. - Open a rule. Within five minutes, When it syncs says Syncs instantly. Check that it works explains more.
Each person can turn Instant sync off under Settings → Your account.
6. Connect monitors and agents
Installation Status is the authenticated counterpart to /health: it reports which of your rules
are running, which are stopped and why, whether the scheduler itself is still running passes, and
one overall verdict, through GET /api/v1/status and an MCP server at /mcp. Both require an
Integration Token, a credential you issue in Settings → Connections → Integrations for one
monitor, dashboard, or agent at a time. A token belongs to the person who issued it and reads only
their status.
As an administrator, you may also let a token read Installation Health at
GET /api/v1/installation/health: incidents about the installation itself, such as a stalled
scheduler or a client secret about to expire, likely causes only you can fix, and how many people
are in each status. It names no rule, calendar, or person, which
makes it the right answer for a monitor that watches the installation for everyone. Tick Also
read Installation Health when you issue the token; it stops working there if you stop being an
administrator.
A token only reads status, and plain HTTP on this machine or your home network is normal for a homelab: anyone on that network could read a token sent to it, and nothing more. Before you use a token from outside your home network, put the installation behind HTTPS (see 5. Use a LAN host or HTTPS), for example with Tailscale Serve or a reverse proxy. Settings notes this in the Integrations group only when it is open at an address that would carry a token across the internet unencrypted. A reverse proxy configured to log request headers will record the token in its own logs the same as it would record a session cookie, so review a proxy’s logging configuration before relying on it.
To issue a token:
- Open Settings → Connections → Integrations and choose Show. The group stays collapsed to one line, such as “2 tokens · last used 3 minutes ago”, until you open it.
- Under Issue a token, name the tool that will use it, for example “Uptime Kuma”, and choose Issue token.
- Copy the token, then choose Done. It is shown only once. If you lose it, issue a new one and revoke the old one.
Each token row says when it was issued and last used, so you can tell which ones are still in use. Revoke cuts a token off immediately; revoked tokens move under one disclosure at the end of the group. Examples for monitors and AI assistants, at the foot of the group, repeats the setups below, filled in with the address you opened Settings at.
Check a token from any machine that will use it:
curl -H "Authorization: Bearer $CALENDAR_GHOST_TOKEN" https://ghost.example.lan/api/v1/statusA healthy installation answers like this (shortened):
{
  "status": "healthy",
  "needs_attention": false,
  "summary": "2 rules running.",
  "last_synced_at": "2026-10-04T09:58:00+00:00",
  "scheduler": { "configured": true, "last_pass_completed_at": "2026-10-04T09:58:00+00:00", "current_pass_started_at": null },
  "counts": { "rules": 2, "running": 2, "stopped": 0, "paused": 0, "overdue": 0, "open_incidents": 0, "blocked_events": 0, "disconnected_accounts": 0 },
  "problems": [],
  "rules": [{ "id": "…", "name": "Work → Family", "state": "enabled", "last_succeeded_at": "…", "problem": null }],
  "incidents": []
}statusis the one verdict, explained in the table below. Alert onneeds_attention: it istrueonly forstalled,stopped, andreview.summaryis one sentence for a dashboard tile.counts.stoppedcounts the rules that do not synchronize until someone acts: each has astoppedproblem, such as a rule whose account needs reauthorization or whose removal was interrupted.counts.runningcounts the enabled rules that have not stopped. A rule whose removal is running is not counted. The Overview counts its running and stopped rules the same way.problemslists every current problem, most urgent first, each with akind(stalled,stopped,review,overdue,blocked, orwaiting), the rule it concerns, and a summary. A problem that an Incident explains also has amessage: the same summary as a stablecodeandparams, such as{"code": "provider_failure", "params": {"kind": "rate_limit", "provider": "google"}}. Every other problem has"message": null. Match oncode, not on the English summary, which can change between releases.incidentslists the open Incidents with their Englishsummary; its entries carry nomessage.rulesnames each rule by its calendars. A calendar with no name, or whose name is an email address or its calendar ID, appears as “Unnamed calendar”, so status never reveals one.- The answer never contains event content, calendar IDs, account emails, or token data.
Use only the Authorization header. A token in the address, such as ?token=, is refused, so it
never lands in browser history or access logs.
Uptime Kuma. Add an HTTP(s) - Json Query monitor:
URL: https://ghost.example.lan/api/v1/status
Headers: {"Authorization": "Bearer <token>"}
Json Query: $.needs_attention
Expected Value: false
This monitor reads the status of the person who issued the token, so it alerts only when that person’s own rules need attention. If other people use the installation, or you have no rules of a provider yourself, add a second monitor on Installation Health with an administrator’s token that has Also read Installation Health:
URL: https://ghost.example.lan/api/v1/installation/health
Headers: {"Authorization": "Bearer <administrator token>"}
Json Query: $.needs_attention
Expected Value: false
It alerts for everyone, without naming anyone: a stalled scheduler, a client secret that expires
within 30 days (when its date is in .env), and a cause only you can fix, such as an expired client
secret or a turned-off Google Calendar API, as soon as it stops anyone’s rules.
Homepage. Add a customapi widget to the Calendar Ghost service:
widget:
  type: customapi
  url: https://ghost.example.lan/api/v1/status
  headers:
    Authorization: Bearer {{HOMEPAGE_VAR_CALENDAR_GHOST_TOKEN}}
  mappings:
    - field: status
      label: Status
    - field: summary
      label: Summary
Claude Code. Keep the token in an environment variable rather than typing it into a command line:
export CALENDAR_GHOST_TOKEN=cgs_…   # from a password manager or shell profile
claude mcp add --transport http calendar-ghost https://ghost.example.lan/mcp \
  --header "Authorization: Bearer ${CALENDAR_GHOST_TOKEN}"
Codex. Add to ~/.codex/config.toml and set CALENDAR_GHOST_TOKEN in the environment Codex
runs in:
[mcp_servers.calendar-ghost]
url = "https://ghost.example.lan/mcp"
bearer_token_env_var = "CALENDAR_GHOST_TOKEN"
The same entry can be added with one command:
codex mcp add calendar-ghost --url https://ghost.example.lan/mcp \
  --bearer-token-env-var CALENDAR_GHOST_TOKEN
Claude Desktop and other apps. Apps that only start MCP servers on your own computer connect
through the mcp-remote bridge, which needs Node.js on
that computer. In Claude Desktop, open Settings → Developer → Edit Config, add this to
claude_desktop_config.json, and restart Claude Desktop:
{
  "mcpServers": {
    "calendar-ghost": {
      "command": "npx",
      "args": ["-y", "mcp-remote", "https://ghost.example.lan/mcp", "--header", "Authorization:${AUTH_HEADER}"],
      "env": { "AUTH_HEADER": "Bearer <token>" }
    }
  }
}
Keep Authorization:${AUTH_HEADER} exactly as written, with no spaces around the colon;
mcp-remote fills in the token from env. If the address starts with http:// and is not
localhost, add "--allow-http" after the address. Settings shows this example already filled in
for the address you opened it at. An app whose connector settings accept only an address, or only
an OAuth sign-in, cannot send a token directly; connect it through this bridge if it can run local
MCP servers.
Both /api/v1/status and /mcp answer the same verdict. Read needs_attention or each rule’s
stop_cause, rather than infer failure from state alone: a rule on Plan Hold remains
degraded, with stop_cause: plan_hold, and has no Stopped problem. counts.held counts held
rules separately from running and stopped rules. They retain their projections and release
without a preview when their Allowance permits, provided the scheduler works. Your plan explains
the stored grace deadline, held rules, and recovery choices. A grace is no status problem, and
mixed running and held rules can have a healthy verdict. See Plan Hold delivery boundary.
Status incident and block totals keep held-owned records, as Activity does; Dashboard counts omit
them. Each status means:
| Status | What it means | What to do |
|---|---|---|
stalled |
Enabled or held rules need a scheduler, but it is not running passes | Restart the service |
stopped |
A rule is suspended, usually because a calendar account lost access | Reauthorize the account in Settings |
review |
An incident, blocked events, or a rule not synced in over a day needs a look | Open Activity or the named rule |
waiting |
A calendar provider is limiting or failing requests | Nothing yet; it retries by itself |
paused |
Rules have synced before, but all are paused or held | Nothing, unless you meant to resume one |
setup |
No account or rule yet, or none has synced | Finish connecting an account and creating a rule |
healthy |
Every enabled rule is running and up to date | Nothing |
Other MCP clients. Any client that speaks MCP over streamable HTTP and can send an
Authorization: Bearer header works: point it at https://<your address>/mcp. The server is
stateless and answers POST only. Calendar Ghost has no OAuth sign-in for MCP; a client that looks
for one gets 404 and should then use the token you configured. Claude Code, Codex, and Claude
Code through mcp-remote were each checked against a running installation with this release.
The MCP server offers three read-only tools, and explains each status to the agent itself:
get_statusreturns the same answer as/api/v1/status.get_ruletakes a rule id or its “Source → Destination” name and adds the rule’s last synchronization and reconciliation outcome: when it ran, whether it succeeded, and how many events it created, updated, deleted, or found in conflict.get_installation_healthreturns the same answer as/api/v1/installation/health, for an administrator’s token with Installation Health.
Ask the agent in plain words, for example “Is my calendar sync healthy?”, “Why did Work → Family stop?”, or “When did each rule last sync?”. Calendar Ghost never changes a rule or a calendar through an Integration Token.
If a monitor or agent cannot connect, see Troubleshooting.
7. Back up, upgrade, and recover
Before an upgrade or host migration:
- stop the service or use a snapshot that guarantees a consistent SQLite backup;
- back up the data volume, the installation master key, and the protected
.envsettings; - record the image or source version; and
- keep the previous backup and version until the new installation passes
/healthand Activity checks.
Recovered installations must retain their persistent Compose configuration.
Update CALENDAR_GHOST_RECOVERY_IMAGE to the desired new image digest and use --no-build, keeping
the prepared path and mounts; do not follow the ordinary build command below or drop the override.
For other checkout-based installations, update the source and rebuild:
Before building, set CALENDAR_GHOST_SOURCE_URL in .env to the immutable commit or release tag
URL for that checkout. Docker builds use that value to make the UI’s Source link identify the
corresponding source; if it is unset, the link falls back to the upstream main tree.
docker compose up -d --buildDo not run docker compose down -v as an upgrade step: removing the named volume removes the local
database, mappings, and connected-account state. Before restarting a restored database, follow
offline inspection and conservative preparation. Keep ingress
closed until access review, owner reauthorization and reconciliation finish. The optional
hosted backup runbook adds continuous replication and independent exports.
Migration 38 adds verified Open registration while preserving the selected policy, Plans setting, and Default Plan. It never turns Open on during upgrade. Stop the service and back up the complete data directory with its matching Master Key and previous image before upgrading. There is no down migration. To roll back, close public registration first, stop the service, and restore the matching pre-upgrade database and image together, losing all later writes. Never run an old image against stored Open or remove migration records manually. See the migration procedure.
Migration 39 preserves existing Users and passwords, allows a missing password for provider admission, and adds identity bindings and short-lived flows. Both providers start disabled. Before upgrading, stop and back up the complete data directory with its matching Master Key and previous image. Rollback restores that database, key, and image together, losing later writes; never run an old binary on the upgraded schema. See migration 39.
8. Troubleshooting
Inspect service status and logs without exposing secrets:
docker compose ps
docker compose logs --tail=100 app
curl --fail http://localhost:8000/healthredirect_uri_mismatch: the URI in Google Cloud andCALENDAR_SYNC_GOOGLE_REDIRECT_URIdiffer. Compare scheme, hostname, port, path, and trailing slash character by character.- Test-user or access warning: add the Google identity under the External app’s Test users list, then restart the consent flow.
AADSTS50011or anotherAADSTSpage from Microsoft: see Microsoft sign-in stops with an error.- The app cannot decrypt connected accounts: restore the original installation master key; do not generate a replacement.
- A LAN callback cannot load: use the SSH tunnel or configure HTTPS as described above. The redirect is followed by the browser, so the callback address must reach the Calendar Ghost host from that browser.
If a synchronization decision is blocked, use the authenticated Activity view and the rule details page before changing calendars or deleting data. Ownership checks are intentionally conservative.
Plan Hold delivery boundary
Production Plan settlement and its visible controls ship together. When Plans are on, running rules beyond the limit keep syncing during their seven-day grace. In Settings → Your account → Your plan, Choose which rules sync opens an inline checklist. Save the complete choice, or choose none to prefer the oldest rules. At expiry only the excess is held. A replacement draft may instead give up its reserved place and need a normal limit-checked Start.
Held rules keep mappings, events, and incremental positions. They release without a new preview at the next scheduled check when room returns. If an account is unauthorized, the released rule becomes stopped for Lapsed Authorization until Reauthorization. Saving keep choices can swap which rules run immediately, without email. The scheduled pass only fills free places. A preview preserves a hold. Pausing, changing policy, or disconnecting can give up a place, so a later Start may be refused; the UI warns before these actions when capacity is scarce. A further lowering restarts grace. Plans off or granting the administrator role releases holds at the next successful settlement; Disabled Users keep them.
Email notifications covers incidents and Plan grace/held-rule notices. Activity keeps incidents; Your plan and held-rule views retain Plan state. Mail can be lost on restart, shutdown, failed pass preparation, or SMTP failure, and a newer pending notice can replace an older one. There is no durable outbox or delivery retry. Identity and security mail is independent of this preference. See the migration 34 rollback notes before running an older image with an activated database.
Test identity email
Open Settings → Administration → Identity email to send a test to your own signed-in
administrator address. Configure the SMTP host and sender, Master Key, and a trusted
CALENDAR_SYNC_PUBLIC_URL first. Identity email requires certificate-verified STARTTLS for remote
SMTP and an HTTPS root origin; only localhost or literal loopback development permits HTTP or a
cleartext relay. Restart after changing environment settings. The UI explains missing or unsafe
configuration and disables the test until it is usable.
The mail server accepting a test does not prove inbox delivery. Check your inbox and spam folder. The last verified time applies only to the current configuration and is separate from the latest attempt. Tests ignore your incident Email notifications preference and the installation’s SMTP recipient. They are limited to three requests per administrator per rolling hour and use a bounded, in-memory worker with no retries, so a restart can lose queued work. A matching successful test lets you explicitly choose Open under Who can join; Only me remains the default. Usable identity mail enables verified email changes independently of whether the test succeeded.
For exact settings and the additive migration 35 upgrade/rollback procedure, see Identity email test readiness. Stop the service and keep a matching database backup and previous image before upgrading; rollback restores those together. A later upgrade from that backup starts without restored email readiness.
Recover a password
When identity SMTP, the Master Key, and a trusted HTTPS root CALENDAR_SYNC_PUBLIC_URL are
configured, sign-in offers Forgot password? under every Registration Policy. A successful
test is useful to diagnose mail, but is not required for recovery. The form always answers,
“If this address can receive a reset link, we will send one.” Active Users receive a single-use
link lasting one hour; unknown and disabled addresses receive no mail. Reset ends existing
sessions and asks the person to sign in again. Identity mail ignores incident email preferences.
Reset retains Integration Tokens: review them in Settings after recovery and revoke unfamiliar ones.
Check your account email before relying on recovery. Existing and invited Users’ addresses remain trusted without retroactive verification. While an email change is pending, the old address stays the recovery address, so whoever owns that mailbox can still request a reset link. Remote identity SMTP requires verified STARTTLS; emailed links require HTTPS, except localhost or literal loopback development. An HTTP LAN installation can still use an administrator’s hand-delivered seven-day link without email. Reset never enables a disabled User.
Check spam and SMTP settings if no link arrives, then retry after waiting. Queue saturation, restart, shutdown, or SMTP failure can lose a message; there is no automatic retry or durable outbox. Attackers can exhaust a person’s email allowance or the installation’s global allowance; ask another administrator for a link or wait for the window. If no administrator can sign in, use the existing backup recovery procedure. Offline recovery uses offline inspection and preparation. See exact allowances and retention. The full memory gate can also delay administrator-link completion from a new network until capacity becomes available.
Before upgrading to migration 36, stop the service and back up its complete data directory and matching Master Key, preserving the previous image. Existing passwords and sessions survive, but legacy reset links are revoked and must be reissued. Rollback means stopping and restoring the matching pre-upgrade database and image together, losing writes since that backup; never run an old image on the upgraded database or remove migration records manually.
Behind HTTPS proxies, configure only their exact peer IPs or narrow networks in
FORWARDED_ALLOW_IPS, never *. Direct use leaves it empty, trusting no forwarded headers.
Overwrite forwarded headers at the edge, restrict direct access to the application port, preserve
Authorization, and enable secure cookies. Docker NAT may otherwise make clients share one gateway
allowance. See trusted proxy headers before exposing recovery.
Change your email
In Settings → Your account, enter the new address and your current password. With usable identity mail, Calendar Ghost shows a pending request and sends a single-use Email Change Link to the new address. The old address still signs in and receives password recovery until you open the link in the requesting account’s session and enter your current password again. Pending requests last 24 hours from request; issued links last 24 hours from preparation. If you are signed out, the link page lets you sign in to the same account. You may cancel or replace a pending request; neither reserves the new address. A successful change keeps that confirming browser signed in, ends your other browser sessions, and keeps your Integration Tokens. A security notice to the old address is sent after the change when delivery succeeds, regardless of Email notifications.
If a link is missing, check spam and the identity SMTP settings, then request another after any cooldown. Mail can be lost on a restart, full worker queue, or SMTP failure and has no automatic retry. The pending state remains visible so you can cancel or replace it. If both SMTP host and sender are absent, direct change with the current password is available; cancel a live pending request first. If either setting is present but the identity configuration is incomplete or unsafe, fix it and restart: Calendar Ghost will not switch to direct change. A previous link can still complete after SMTP becomes unavailable. See verified email changes for exact limits, retention, and migration 37 for backup and rollback.
This page is built from docs/self-hosting.md; edit it on GitHub.